Intro
From all the visuals of any game you have ever seen, to the wonders of hardware acceleration in the form of PhysX: Your GPU is what drives nearly every aspect of game development. In fact without it we wouldn’t be able to produce anything close to the level of current games.
For a long time I have promised writing about Compute Shaders and with my latest project Knightfall I could finally take a deep dive into the wonderland that is hardware acceleration.
One of the aspects of said hardware acceleration are “Compute Shaders”. A general purpose shader that gives you the ability to make use of the immense parallel processing power of your GPU, without the constraints of specialized shaders.
While not a magic all-rounder, they can give a very significant performance boost to batchable algorithms and are a must for any complex simulation.
So in this series I will try my best to fully explain the Unity Compute Shader system in all it’s glory.
Note: Even though it is tempting, I highly advise you to not skip over the theory, since making your code run efficiently on the GPU is like 90% of the work.
Before we can dive into the code, we need to do a refresher on terminology and archtitecture, because working on the GPU is very different to working on the CPU. And knowing how to effectively make use of both pieces of hardware is 90% of the work.
The Theory
How does a GPU work?
First let’s start at the very basics: What is the actual difference?
Short answer: nearly everything, but not really.
The Purpose
CPUs are meant to be all-rounders and are the computational heart of your PC. They are generally optimized for running any set of instructions (a programm) as fast as possible. Each core is a beast, but doesn’t really like to share.
GPUs on the other hand are dedicated for running a alot of floating point operations in parallel. Multiple smaller cores can execute a single instruction at the same time.
As the name implies, a “GPU” (Graphical Processing Unit) is mainly dedicated to graphical computing. But since that just comes down to “working with alot of floats”, they can be easily used to assist many other computations aswell.
The Architecture
GPUs are structured a little different to a CPU, so they can actually achieve what they are meant to do. This will become important, when determining how to structure your data and logic.
While CPUs have a few independent cores, a GPU has alot of so called “Work Groups” of usually 16 mini-cores.
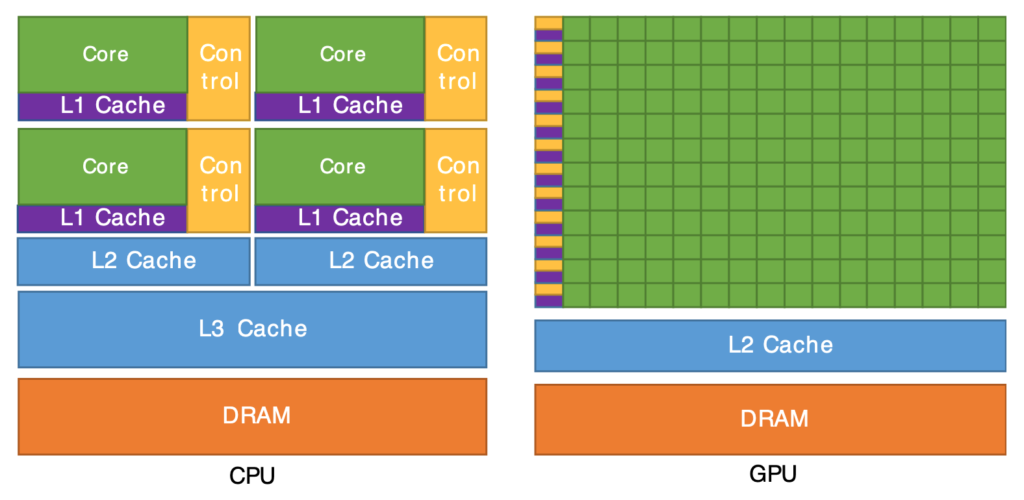
Similar to a single core in a CPU, a Work Group can only execute one instruction at any given time. However they are executing it on all of their 16 physical cores in parallel.
Work Groups are not executed directly, but bundled into 64-core “WaveFronts” (for AMD) or 32-core “Warps” (for Nvidia), which can be spawned by the graphics API. Any time you are running a command on the GPU, it is using one or more full WaveFronts/Warps, even when you only really need 5 cores.
This means that your code will benefit from fully using the 32/64 cores per WaveFront/Warp and since Warps can run in “Dual-Warp” mode (so also 64 cores), a multiple of 64 is the most efficient choice.
The Workflow
Engines like Unity highly abstract the work with the GPU up to the point that it is very easy to use, but you also don’t really see what is happening behind the scenes. Which can be a blessing, but you still have to get a basic understanding of how the components interact.
The main thing to consider here is that this is a piece of dedicated hardware that can’t simply access the code or data on your CPU (e.g. your game application). You’ll need to send the data to the GPU first, which is costly and tell it to run your programm on that data.
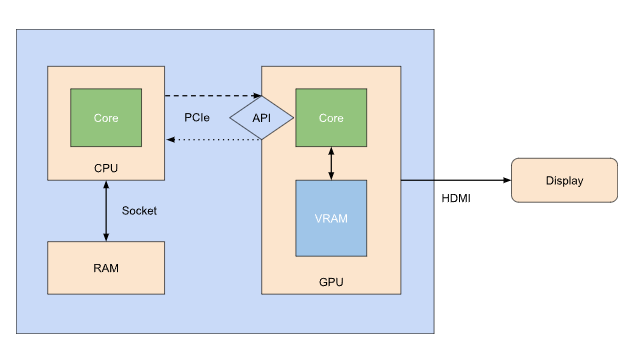
Your CPU and RAM are tightly coupled and can communicate with very little latency. Your GPU however has it’s own dedicated set of RAM, called “VRAM” or Video-RAM.
This means that every instruction and data package needs to be sent through PCIe to the API interface of the graphics card. Which is costly and has a comparitively high latency. So you want to keep the amount of data transfer as low as possible.
A GPU also isn’t really expected to return much back to the CPU. It’s more of a fire-and-forget kind of thing.
What you see on screen is just your CPU telling your GPU the following things up to and above 60 times a second:
- Set the screen texture to all black pixels
- Draw this triangle *here* and with *this* color (a few thousand times)
- Push the screen texture to the Display
With Compute Shaders we want to use the unlimited power of hardware acceleration, but also not disturb our GPU in doing what it is actually meant to do: Render our screen.
So you’ll have to watch out that your GPU is spending the necessary time actually rendering things and your computing is done asynchronously.
How do (Compute) Shaders work?
To make use of a GPU, you’ll need to write a “Shader”, using a dedicated Shading language.
Shading Languages
Since we are talking about Unity, you are most likely used to C#, a high level object-oriented language running on the CPU. It is highly abstracted from the hardware (hence “high” as in “higher up” in the hierarchy of abstraction layers from the hardware to the user) and has alot of nice language features, that make your development (and life) easier.
A GPU on the other hand is used through pogramms called “Shaders”, written in a functional shading language. Which means that you won’t have nice high level types like Lists and Classes and near zero builtin memory managment.
But don’t worry, since your data should be mostly arrays of floats with a few parameters, you won’t likely need any higher type. For everything else there’s still structs and arrays.
Now when working without a framework or engine like Unity, you’d need to choose a shading language based on what graphics API you are targeting. But luckily Unity just uses “HLSL” and auto-compiles the shader variantes for all necessary platforms and configurations.
For anyone interested though:
- DirectX -> HLSL
- OpenGL/Vulkan -> GLSL
- Metal -> MSL
- WebGPU -> WGSL
If you have experiene with any C-like or general low-level language, HLSL (or any of the others) shouldn’t be a problem for you.
For everyone else: Better not skip the theory.
What is a (Compute) Shader?
A “Shader” is a functional, leightweight, low-level scripts running on the GPU. Nothing more, nothing less.
They are usually written in a C-like low-level language like HLSL. Which is exactly what we are going to be using in Unity.
Every Shader has a form of entry point (a main function, or “Kernel”), with a set of parameters, usually defined by the type of Shader and the developer. The entry point will be called by the GPU on each core upon “Dispatch” (the execution of the programm/Shader).
There are many other types of shaders, some of wich you may have already come across, like Pixel and Vertex Shaders. Those are specified versions of shaders, dedicated to a specific purpose, like in the case of Vertex Shaders: Running over all vertices of a mesh and modyfing each of them per core and based on the logic in the shader.
Compute Shaders are more general-purpose solutions, that don’t have that much wrapping code.
Here is an example for a simple Compute Shader, that just adds two 2D textures together into a result texture:
//kernel definitions
#pragma kernel CSMain

//input parameters
Texture2D<float> Input1;
Texture2D<float> Input2;

//output parameters
RWTexture2D<float> Result;

//kernel declarations
[numthreads(8,8,1)]
void CSMain (uint3 id : SV_DispatchThreadID)
{
    //executed on every core
    Result[id.xy] = Input1[id.xy] + Input2[id.xy];
}
We will dive deeper into what every line actually does in the next tutorial section.
For now just note that we are defining an entry point, our parameters and buffers, and how we are using the Thread ID to iterate through the texture.
Global Variables
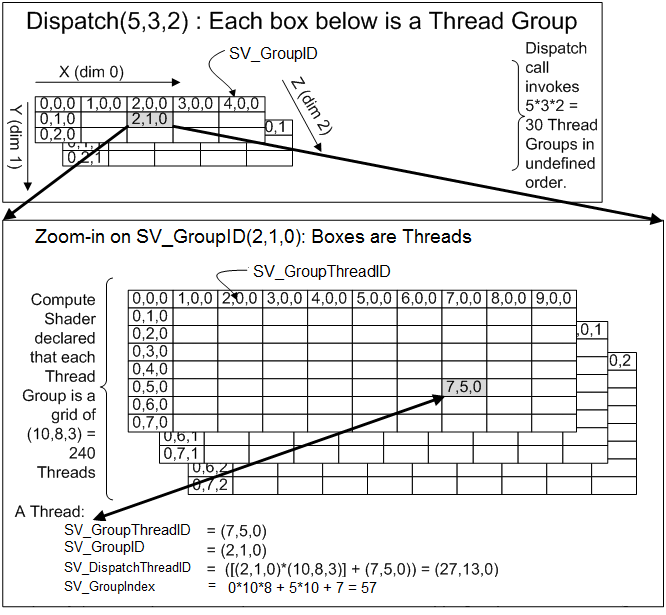
Since a core needs to know what part of the result it is supposed to compute, there are a bunch of global variables that you can use in your logic.
The most used of those is the “SV_DispatchThreadID” which corresponds directly to the position of a single pixel in the result texture.
Microsoft has an example of how these variables are calculated for each core, which can be a little confusing, but it gives a complete overview of how you can use up to 3 dimensions to spawn Threads in a single Thread Groups (which is essentially a WaveFront/DualWarp).
Things to consider
Apart from the general theory there are a few things to consider, when working on the GPU.
Branching
One very important limitation of a GPU is it’s near inability to work efficiently when it comes to “Branching”. Which is the process of your logic spliting into different branches, depending on conditionals.
Everytime to use a conditional, like “if”, “else” or “switch”, or a loop like “for” or “while”, your logic is split into two branches. One for the coditional being true, and one for it being false.
//main branch
float result = 0;

if (condition)
{
    //branch A
    result = a + b;
}
else
{
    //branch B
    result = a - b;
}
Now if one core is evaluating the condition as true and another as false, both will try to execute a different command from one another (“add” and “subtract”). Which they just can’t do. Instead the GPU is actually executing both branches on all cores and will discard the results/changes of the uneccessary branch. This process also creates overhead on the GPU because it still needs to evaluate those branches and keep track of them.
Effectively this will lead to wasting computing power on unecessary calculations.
So: Try to use as few conditionals as possible.
But! Also don’t overengineer it. Sometimes a single conditional is better than the abhorrent workaround from 2AM. Test both versions first. Your compiler might have already taken care of small optimizations and there are exceptions.
For example the following code
float result = 0;
if (condition)
    result = 2;
else
    result = 3;
will be condensed into a tenary
float result = condition ? 2 : 3;which modern GPUs have a “swap” instruction, that can assign a value based on a condition, without actually creating a branch. Since the instruction here is the same (store value) we just need to “swap” the variable, which can be optimized on the hardware level.
And to further dwelve into this topic, I’ll show you how you can create the same steps in your logic, by only using arithemtic.
There is a very useful method on GPUs: “step”, which just calculates a very steep function, that can be used to directly compare a value to a minima/maxima.
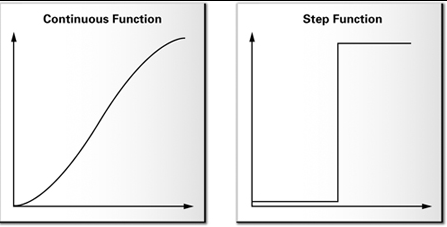
And behaves like this:
float3 step(float3 a, float3 x)
{
  return x >= a;
}
So when using two step functions to calculate either condition, we can compute different logic, without actually creating a branch.
float branchOne = x + 2;
float branchTwo = x - 4;

//arithmetic
float result = step(0.5, x) * branchOne + step(x, 0.5) * branchTwo;

//or bit-wise
float result = step(0.5, x) & branchOne | step(x, 0.5) & branchTwo;
If x is above or equal to “0.5”, we are effectively returning “x+2” and in all other cases “x+4”, since our step function will return “1” only for one branch and “0” for the other. But since no logic is behind any real conditional, all cores are going to do the exact same thing at any given time. Hence there is no branching involved.
You may have already noticed, that we can’t really get around computing both branches first. This is the tradeoff for having no overhead from branching. But keep in mind that your GPU would compute both branches anyway. So we can save on the overhead.
Leightweight Programming
A GPU as very good at computing things, because it literally machine guns the operations through all of its cores. But single GPU cores on themselves have only a very limited amount of resources. Both in terms of computational power, aswell as local storage space.
Or in other words: A single GPU core is slow.
Therefore Shaders should be as leightweight as possible.
Now when you look at the compiled code from your shaders, you will notice that it really doesn’t look like what you wrote in your original shader file. That’s because Unity is already heavily optimizing your code to keep your shaders as leightweight as possible.
But there are things that Unity can’t optimize. Mainly how you approach your problem.
Don’t try to create a gigantic god-shader with thousands of lines of code or try to compute 60 GB worth of data every second.
Remember that your GPU also needs to render your game and other things in the same time.
NaN
You may have already heard of the ominous NaN value, that pops up here and there on Reddit.
NaN is short for “not a number” and indicates that a calculation has produced a result that is not really a number or that is just uncomputable in the first place.
For example: Dividing a value by zero.
In a language like C# you likely won’t come across this type, since the language handles invalid calculations through other ways, like exceptions.
A GPU however can’t really raise an exception, due to the way it works. It rather uses the low-level way of telling you that something went wrong: It produces a NaN.
And when any subsequent calculation involves a NaN, then the result will also be a NaN, leading to a propagation effect.
So when you have a NaN somewhere in your calculations it will spread like a virus and the actual origin is usually very hard to track down.

The only way around this is to always check the ranges of the values in any risky computation, or use “unrisky” operations. For example when you just want to scale a value, it is safer to use a multiplication, than a division, since a division can quickly produce a divide-by-zero and return a NaN.
So instead of:
float result = input / 2;you can write this:
float result = input * (1 / 2); //dynamic
float result = input * 0.5; //or with a precomputed value
Which yields the same result, but won’t produce an NaN if the value is zero, since 0 / 2 is incomputable, but 0 * 0.5 is just 0.
Race Conditions
Since the purpose of GPUs is to compute in parallel you’ll have to look out for so called “Race Conditions”. Or in other words: When multiple cores try to read and write the same positions in memory.
For example, blurring a texture on itself creates a classic race condition:
float4 colorMiddle = TargetTexture[int2(id.x, id.y)];
float4 colorLeft = TargetTexture[int2(id.x - 1, id.y)];
float4 colorRight = TargetTexture[int2(id.x + 1, id.y)];
float4 colorTop = TargetTexture[int2(id.x, id.y - 1)];
float4 colorBottom = TargetTexture[int2(id.x, id.y + 1)];

float4 colorSum = colorMiddle + colorLeft + colorRight + colorTop + colorBottom;

TargetTexture[id.xy] = colorSum * (1 / 5);
We are modifying a texture based on the average of the current pixel and each surrounding pixel. However since we are writing to a pixel, that is used in the calculation of another core, we are getting modifyed values.
We are “racing” for the value.
Basically you don’t want cores to access the same point in your data. And if you need to modify something based on itself, you’ll have to use a buffer to store the modifyed values.
Note: The reason that I didn’t just write “colorSum / 5”, is because this can produce a NaN with zeros in any channel. Multiplying by a reciprocal gives the same result, but without the hassle.
Enough with the theory
Right. There is only so much theory that one can handle at once. Just keep in mind what your GPU is meant for and you should be go to move on to the actual coding part.
2. The Code
Creating a Compute Shader
Go into your Project Explorer and hit “Create->Shader->Compute Shader”. Give it a name and open the newly created file.
Unity should’ve already created a basic code, but in order for us to immediatly see something actually interessting, we need to modify it a little:
#pragma kernel CSMain

RWTexture2D<float4> Result;

[numthreads(8,8,1)]
void CSMain (uint3 id : SV_DispatchThreadID)
{
    Result[id.xy] = float4(id.x / 8, id.y / 8, 1.0, 1.0);
}
There you go, that’s a basic Compute Shader, operating on a 2D RenderTexture.
To explain what each of these lines does, let’s go through them line-by-line.
First, you declare a “Kernel”, essentially registering the specified function as a valid entry point.
#pragma kernel CSMainNext we specify input and output parameters. In this case we only have a RenderTexture (RWTexture2D) as the output, called “Result”, with 4 float-channels (float4).
RWTexture2D<float4> Result;And finally the heart of our Compute Shader: the actual logic…which for now doesn’t really do much. But we will get to that.
[numthreads(8,8,1)]
void CSMain (uint3 id : SV_DispatchThreadID)
{
    Result[id.xy] = float4(id.x / 8, id.y / 8, 1.0, 1.0);
}
“numthreads” tells the GPU how many Threads should be spawned per Thread Group. So 8 on the X-Axis, 8 on the Y-Axis and the Z-Axis is effectively unused (thus 1, for only one Thread on that axis). They should always be >= 1 and multiplied together net a value of 64 or multiples of it. (8 * 8 * 1 = 64)
Thread Groups above or below 64 are possible, but will lead to wasted computing power.
I also want to mention, that most of the time you are using textures, you are effectively working with a value range of [0.0 – 1.0], due to the way that textures are handled by the GPU. Any value above or below that will be clamped. So our result will just clamp to all 1’s, for any Thread with IDs above 8.
Running a Compute Shader
To run your newly created Compute Shader, you’ll have to create a new MonoBehaviour and add the “ComputeShader” class from Unity. It allows you to just drag and drop your newly created Compute Shader into a Scene object and actually interact with/dispatch the Shader. For the purposes of the tutorial, here is a quick-start example:
using System.Collections;
using System.Collections.Generic;
using UnityEngine;

public class ExampleShader : MonoBehaviour
{
    public const int THREAD_GROUP_SIZE_X = 8;
    public const int THREAD_GROUP_SIZE_Y = 8;
    public const int THREAD_GROUP_SIZE_Z = 1;

    public int textureSize = 512;
    public ComputeShader computeShader;

    private RenderTexture _target;

    private void Start()
    {
        _target = new RenderTexture(textureSize, textureSize, 32, RenderTextureFormat.ARGB32);
        _target.enableRandomWrite = true;
        _target.Create();

        int threadGroupsX = Mathf.CeilToInt(_target.width / THREAD_GROUP_SIZE_X);
        int threadGroupsY = Mathf.CeilToInt(_target.height / THREAD_GROUP_SIZE_Y);
        int threadGroupsZ = THREAD_GROUP_SIZE_Z; //unused

        var kernelIndex = computeShader.FindKernel("CSMain");
        computeShader.Dispatch(kernelIndex, threadGroupsX, threadGroupsY, threadGroupsZ);
    }

    private void OnGUI()
    {
        if (_target != null)
            GUI.DrawTexture(new Rect(0, 0, _target.width, _target.height), _target);
    }
}
When put into any object in the Scene and you are entering Play Mode, this class will execute the linked Compute Shader once and display the results in the top left of your screen.
Let’s again look at it line-by-line.
First we are defining our Thread Group Sizes (again), like we did in the Compute Shader.
public const int THREAD_GROUP_SIZE_X = 8;
public const int THREAD_GROUP_SIZE_Y = 8;
public const int THREAD_GROUP_SIZE_Z = 1;
Next we are defining 2 variables for the inspector and 1 for our output RenderTexture.
public int textureSize = 512;
public ComputeShader computeShader;

private RenderTexture _target;
But the real juice is in the “Start” method. We are creating a new temporary RenderTexture the size of our inspector Parameter and are giving it 4 channels. The 32 for the “stride” value means that a single pixel o this texture contains 32 bits of data, 8 bit (or 1 byte) for each channel. And the Format “ARGB32” just tells Unity that this really is a 4 channel ARGB texture.
_target = new RenderTexture(textureSize, textureSize, 32, RenderTextureFormat.ARGB32);To use a RenderTexture inside a ComputeShader as an output value that we write into, we need to tell Unity that this texture recieves random write calls and finally tell Unity to create the actual GPU side of the texture (e.g. creating it in the VRAM).
_target.enableRandomWrite = true;
_target.Create();
Then we calculate the actual amount of Thread Groups that we need to process the whole texture. The Z value is always 1, when working with 2D data, like textures, but I have still added the coresponding variables for completeness.
int threadGroupsX = Mathf.CeilToInt(_target.width / THREAD_GROUP_SIZE_X);
int threadGroupsY = Mathf.CeilToInt(_target.height / THREAD_GROUP_SIZE_Y);
int threadGroupsZ = THREAD_GROUP_SIZE_Z; //unused
Now we nearly have all the data that we need to run the shader. The only thing left ist the Kernel Index, which is basically “0” since we only have one Kernel defined in this Compute Shader, but again for completeness, this is how you would get the Index of a Kernel by its method name.
//compute shader def: #pragma kernel CSMain
var kernelIndex = computeShader.FindKernel("CSMain");
Finally we bind the ouput parameter to the actual buffer (or texture in this case) and dispatch the Shader.
computeShader.SetTexture(kernelIndex, "Result", _target);
computeShader.Dispatch(kernelIndex, threadGroupsX, threadGroupsY, threadGroupsZ);
The “OnGUI” part just draws the output of the texture onto the screen, so you can see it in the Game view.
Generating Simple Data
Your first stripe
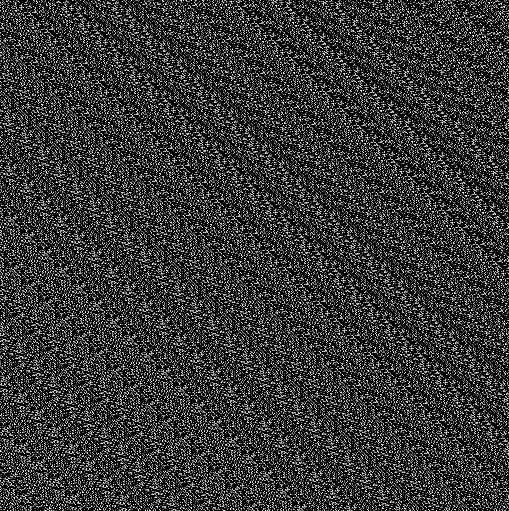
Now, when hitting Play, you should see something like the image below.

Doesn’t look like much, but it shows you the first Thread Group on the X-Axis (cyan), the Y-Axis (magenta) and where those meet in your actual first Thread Group (blue). This should give you a sense of how the Compute Shader works through your texture: in 8×8 chunks (a Thread Group) that process each of the 64 pixels as one per Thread.
The reason why everything else is white, is because every value higher than 1 is clamped by the way a texture works. As already mentioned per default they can only encode numbers from 0.0 to 1.0 as floats, which represent 0-255 as an integer for the color value of that channel. That’s because every channel has 8 bit to store it’s values, which effectively can only represent 256 distinct values.
Congrats. You have successfully run a program on your GPU. But it doesn’t really do much, so let’s give it some actual purpose.
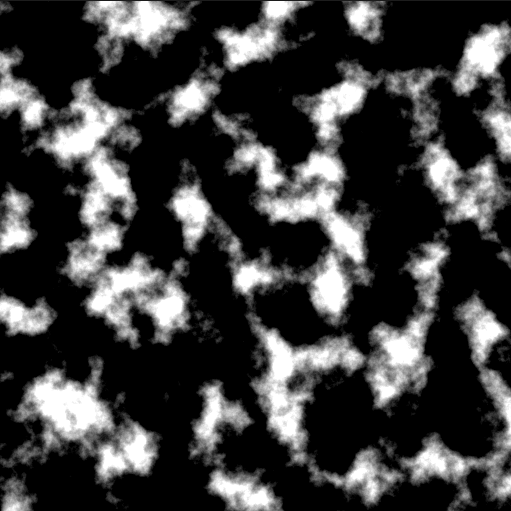
Generating a Noise texture
Since this is not a tutorial about Noise, we will make use of an external library to actually compute the noise values. A perfect opportunity to introduce how to share code between Compute Shaders.
First follow the instructions for the “keijiro/NoiseShader” repo: https://github.com/keijiro/NoiseShader
This will install a new package into your Unity project, with “.hlsl” files, that you can include into your Shaders to make a bunch of noise functions available.
We just need to modify our script slightly, to make use of a noise function:
#pragma kernel CSMain

#include "Packages/jp.keijiro.noiseshader/Shader/SimplexNoise2D.hlsl"

RWTexture2D<float4> Result;

[numthreads(8,8,1)]
void CSMain (uint3 id : SV_DispatchThreadID)
{
    float noise = SimplexNoise(id.xy);
    Result[id.xy] = float4(noise, noise, noise, 1.0);
}
Again, congrats! You have created what sometimes happened to TVs back in the day of cubic monitors.
Generating a better Noise texture
Unimpressed? Well let’s add some noise layers together and see what happens:
#pragma kernel CSMain

#include "Packages/jp.keijiro.noiseshader/Shader/SimplexNoise2D.hlsl"

RWTexture2D<float4> Result;

float SimplexNoiseOctaved(float2 pos, int ocatves, float frequency, float amplitude, float gain, float lacunarity)
{
    float value = 0;
    for (int i = 0; i < ocatves; i++)
    {
        value += amplitude * SimplexNoise(pos * frequency);
        amplitude *= gain;
        frequency *= lacunarity;
    }
    return value;
}

[numthreads(8,8,1)]
void CSMain (uint3 id : SV_DispatchThreadID)
{
    float noise = SimplexNoiseOctaved(id.xy, 8, 0.01, 1, 0.5, 2);

    Result[id.xy] = float4(noise, noise, noise, 1.0);
}
The new function “SimplexNoiseOcatved” is a commonly known noise technique and not important for the purpose of this tutorial. Just note that just these few changes result in a texture that can immediatly be used as a heightmap for generating a terrain mesh.
Passing Simple Parameters
Now in the example above it could be useful to have the parameters for the noise computation as parameters for our shader.
Adding a parameter is the same as declaring the output data. Just add a new variable with the necessary data type. For our purpose we need 5 new parameters to control every aspect of the noise texture. “Octaves” will stay constant, since it is directly linked to the amount of iterations of a loop and can be optimized by the compile if it is a constant.
float Frequency;
float Amplitude;
float Gain;
float Lacunarity;

...

void CSMain (uint3 id : SV_DispatchThreadID)
{
    float noise = SimplexNoiseOctaved(id.xy, 8, Frequency, Amplitude, Gain, Lacunarity);

    ...
}
And finally declare and pass them from the C# script:
...

public float noiseFrequency = 0.01f;
public float noiseAmplitude = 1f;
public float noiseGain = 0.5f;
public float noiseLacunarity = 2f;

private void Start()
{
    ...

    var kernelIndex = computeShader.FindKernel("CSMain");

    computeShader.SetFloat("Frequency", noiseFrequency);
    computeShader.SetFloat("Amplitude", noiseAmplitude);
    computeShader.SetFloat("Gain", noiseGain);
    computeShader.SetFloat("Lacunarity", noiseAmplitude);

    computeShader.SetTexture(kernelIndex, "Result", _target);

    ...
}
Scalar parameters do not need a specific kernel index and are set for all kernels in the Compute Shader file. The full list of supported scalar types is:
- Float (float)
- Integer (int)
- Bool (bool)
- Vector2 (float2)
- Vector3 (float3)
- Vector4 (float4)
- Matrix2x2 (float2x2)
- Matrix3x3 (float3x3)
- Matrix4x4 (float4x4)
They work pretty much the same way as the 4 float parameters above, except that you need to call “SetInteger” for integers, “SetBool” for bools, etc. and use a native HLSL type
Generating complex data
Passing Complex Parameters
Now there will come at time, where a simple float or a texture won’t cut it anymore and you need complex data. This is where Compute Buffers come into play.
You’ll need to define a struct in both your Compute Shader, aswell as your C# code. Both structs need to be of the same structure (same parameters with the same types) and you can only use the scalar types from above.
Let’s say you want to use a Compute Shader to fill a 3D-grid of Voxels.
Again for the purposes of this tutorial: the technique behind Voxels is mostly irrelevant and you should have heard of Minecraft by now. But to quickly sum it up: “Voxel” is short “Volumetric Pixel” and describes the method of storying the “fullness” of space in form of a static 3D-grid. I’m using it as a real world example of how you interact with complex data.
Anyway, to show how you can pass and modify a list of complex data, we will pass in an empty grid of voxels and fill it with a sphere of full voxels.
If you haven’t already, create a new Compute Shader and delete the boiler plate code.
First we need a struct to store the single information of every Voxel.
//C#
struct Voxel
{
    Vector3 position;
    float fullness;
}
//Shader
struct Voxel
{
float3 position;
float fullness;
}Both C# and the Shader need to have the same struct definition and you can only use the scalar types that a Shader can support (listed above), since they need to map 1:1.
Now we can add the necessary parameters to our shader: We need a list of all voxels in the grid, the grid size on one axis, the sphere coordinates and the sphere’s diameter.
float SphereDiameter;
float3 SpherePosition;
int GridSize;

RWStructuredBuffer<Voxel> Voxels;
To pass a list of structs, we can’t just simply define an array. This comes down to the way that memory is handled on the GPU. Rather we need to create a “RWStructuredBuffer”.
And since we want to operate in 3 dimensions (on a 3D-grid of Voxels), but a Compute Buffer can only store one-dimensional data, we need to compute a one-dimensional index from the three-dimensional voxel coordinates. Which is very simple, as long as all axis of the grid have the same length:
//two-dimensional
int index = pos2D.y * SizeY + pos2D.x;

//three-dimensional
int index = pos3D.z * SizeX * SizeY + pos3D.y * SizeX + pos3D.x;
Note: When you are working with cubic grids (e.g. equal lengths on all sides), the order of operatiors doesn’t really matter. But for uneven arrays, you want to take note on that.
Now we can create our main function that sets the fullness of each voxel based on the distance to the sphere position:
[numthreads(4,4,4)]
void CSMain (uint3 id : SV_DispatchThreadID)
{
    int gridIndex = id.x * GridSize * GridSize + id.y * GridSize + id.z;

    Voxel v = Voxels[gridIndex];

    float dist = distance(id.xyz, SpherePosition);
    v.fullness = dist < SphereDiameter ? 1 : 0;

    Voxels[gridIndex] = v;
}
The code should be quite self-explanitory, but the main difference to our previous example is the usage of Voxels and “[numthread(4,4,4)]”, where we have just specified that we are using all 3 coordinates to spawn threads.
In C#, we are going to create a new script, which is mostly the same to our previous script:
public class TestShader2 : MonoBehaviour
{
    public const int THREAD_GROUP_SIZE = 4;

    public int gridSize = 64;
    public Vector3 spherePosition = new Vector3(32, 32, 32);
    public float sphereDiameter = 16f;

    public ComputeShader computeShader;

    private ComputeBuffer _voxelBuffer;
    private Voxel[] _voxels;

    private void Start()
    {
        var voxelCount = gridSize * gridSize * gridSize;

        _voxels = new Voxel[voxelCount];
        _voxelBuffer = new ComputeBuffer(voxelCount, Marshal.SizeOf(typeof(Voxel)));

        _voxelBuffer.SetData(_voxels);

        int threadGroups = Mathf.CeilToInt(gridSize / THREAD_GROUP_SIZE);

        var kernelIndex = computeShader.FindKernel("CSMain");

        computeShader.SetFloat("SphereDiameter", sphereDiameter);
        computeShader.SetVector("SpherePosition", spherePosition);
        computeShader.SetInt("GridSize", gridSize);

        computeShader.SetBuffer(kernelIndex, "Voxels", _voxelBuffer);

        computeShader.Dispatch(kernelIndex, threadGroups, threadGroups, threadGroups);
    }
}
As with the previous example, we are defining some parameters to give control over the shader. However our usage of the result has changed, as well as how we are spawing Thread Groups.
Since we are working on a cubic grid, an we are spawning a 4x4x4 Thread Group, we can again just use one numer to spawn all 3 axes, which is to divide the grid size by the size of one Thread Group.
The juicy part however is the usage of a “ComputeBuffer”, which is the C# equivalent of a StructuredBuffer. There are other types aswell, but we will get to those in a bit.
To pass complex data to (and from) the GPU, we need to have a high-level representation of our data on the CPU-side (a simple Voxel-Array), aswell as the ComputeBuffer, which represents the buffer on the GPU-side.
_voxels = new Voxel[voxelCount];
_voxelBuffer = new ComputeBuffer(voxelCount, Marshal.SizeOf(typeof(Voxel)));
A Compute Buffer needs two infos: The length of the array that it is supposed to represent, aswell as the actual byte-size of one entry of that list. The later of which can simply be computed by C#. But for educational completeness: It is the byte-size of all components of that struct combined. So a struct with two 8-byte floats would be 16 bytes in total.
Then we can use “.SetData” to set the current values from a high-level array:
_voxelBuffer.SetData(_voxels);This call will actually send data from the array (CPU) to the buffer (CPU), where it can be used in your shaders.
Then you can bind the buffer to any shader that you like, which in our case is just this one:
computeShader.SetBuffer(kernelIndex, "Voxels", _voxelBuffer);Which is the whole magic allready. Your shader can now use complex data from your CPU.
Returning data to the CPU
Now in most cases it would be best to leave the data on the GPU and integrate it directly into your shaders. But sometimes you just need that data back on the CPU.
Which is quite easy. After your “Dispatch” call, you can just call “.GetData” in very much the same way that we have previously sent data to the GPU.
_voxelBuffer.GetData(_voxels);And in very much the same way, it actually tells the GPU to return data to the CPU. This time from the buffer back to the array.
This call also blocks your main thread, until the GPU has finished computing and transfering the data. Which is usually not that noticable, but can get unusable quite qickly. Luckily modern GPUs support an asynchronous callback, which is very easy to use. Just wrap your “.GetData” call:
AsyncGPUReadback.Request(_voxelBuffer, (request) =>
{
    _voxelBuffer.GetData(_voxels);
});
This doesn’t block the main thread, but introduces 1-5ms of latency until the data is actually returned to the CPU. On top of the time needed to calculate all the threads and transfering your data.
Often times you’ll need to consider if you can spare the latency for some heavy calculations to keep your game at 60 FPS.
Disposing Buffers
Once you have created a ComputeBuffer, that space in the GPU’s VRAM is essentially locked and cannot be used until you free it up again. To do this, you’ll want to call “Dispose”, once you don’t need the ComputeBuffer anymore:
_voxelBuffer.Dispose();In our case, we can dispose it after we have recieved our data, at the end of our “Start” method.
But when you are calling a Compute Shader multiple times on data with the same size, you’d want to keep the ComputeBuffer object and just call “.SetData” instead. This saves a little overhead in disposing and creating a new buffer everytime.
Unity also auto-disposes all remaining ComputeBuffers when closing the application. So you don’t have to worry about persistent memory leaks all-too-much, but that doesn’t save you while the game is running.
Adding Passes
The thing is: We can’t really see what’s happening in there. A perfect opportunity to explain how you can add multiple passes to your workflow.
First add another kernel to your shader file:
#pragma kernel CSRenderThen add a secondary method, with all new needed parameters in the same way that you defined the first kernel at the end of your Voxel ComputeShader file. In our case we want our secondary pass to render a cross-section of the Voxel grid.
int CrossSectionIndex;
RWTexture2D<float4> CrossSection;

[numthreads(8, 8, 1)]
void CSRender(uint3 id : SV_DispatchThreadID)
{
    int gridIndex = id.x * GridSize * GridSize + id.y * GridSize + CrossSectionIndex;

    Voxel v = Voxels[gridIndex];

    float color = v.fullness;

    CrossSection[id.xy] = float4(color, color, color, 1);
}
Next we need to add a new RenderTexture and a new parameter to our C# script:
public int CrossSectionIndex = 32;
private RenderTexture _crossSectionRT;

...

public void Start()
{
    _crossSectionRT= new RenderTexture(gridSize, gridSize, 32, RenderTextureFormat.ARGB32);
    _crossSectionRT.enableRandomWrite = true;
    _crossSectionRT.Create();

    ...
Now we just need the index of our secondary kernel, which is almost surely a “1”, but to get it dynamically we can again use. And we will store it as a class variable so we can use it in other methods.
_renderKernelIndex = computeShader.FindKernel("CSRender");With that index, we can bind the RenderTexture to our secondary pass, aswell as the Voxel data. Unlike scalar parameters, which are global in respect to the shader file, you need to bind every texture and buffer explicitly to a single kernel.
computeShader.SetBuffer(rederKernelIndex, "Voxels", _voxelBuffer);
computeShader.SetTexture(rederKernelIndex, "CrossSection", _crossSectionRT);
But instead of computing the texture once, like we did before, we are going to render it continously, so we can change the CrossSectionIndex at runtime and look through our grid in realtime.
Add the “Update” method from Unity and let our new ComputeShader kernel render our grid once every frame:
private void Update()
{
    computeShader.SetInt("CrossSectionIndex", crossSectionIndex);

    int threadGroups = Mathf.CeilToInt(gridSize / 8);
    computeShader.Dispatch(_renderKernelIndex, threadGroups, threadGroups, 1);
}

Done. Now your ComputeShader is computing your data and displaying it directly on the GPU. You can also remove the “.GetData” call, if you have added it previously. Since any computation already happens on the GPU, we don’t need to return data back to CPU. It’s always important to try and minimize the amount of data transfered between both.
Other Optimizations
Read-Write Buffers
You may have noticed that there is a “Texture2D” and a “RWTexture2D” aswell as a “StructuredBuffer” and a “RWStructuredBuffer”. The difference between being the prefix “RW”, which stands for “Read-Write” and indicates to the GPU, that this buffer will be written into.
The prefix is necessary, if you intend to write to the buffer. But if you only read from it, you should use the version without “RW”, because the compiler and GPU can optimize it for performance that way.
Native Arrays
When using the “NativeArray” class from Unity, you are creating low-level buffers on the CPU-side that work a little faster with Compute Buffers, since you are skipping some of the Marshalling processes.
Usually this only gives you a real benefit when your data is being used in another native process. Which there aren’t too many of.
However there is one, that this is basically built for: Burst Jobs.
Whenever your data is being used in both a ComputeShader and a BurstJob, youll want to use NativeArrays directly to save on transfer costs.
Buffer Types
Aside from regular StructuredBuffers (“Default”) that we have used so far, there are other types of buffers aswell which you can specify while creating the CompureBuffer. Most of them like “Raw” and “Default” are for bit-magic and thus only used for advanced stuff that is beyond this tutorial. But there are a few very usefull ones, that you should know about.
Append Buffer
Now since GPUs are made to work on constant lengths, they work best on those and don’t support dynamic lengths all to well. But there are still ways to get the nice features of a List, while adhering to the constrains of finite space.
The “Append” buffer type, with the acompanying “AppendStructuredBuffer<T>” type in HLSL essentially behaves like a List<T>. Allthough increasing it’s own space, much like with a regular List, comes at the cost of performance.
Inside your shader you can just use the “.Append” method to add new entries:
AppendStructuredBuffer<int> Buffer;

void CSMain (uint3 id : SV_DispatchThreadID)
{
    Buffer.Append(123);
}
And to get the amount of entries in your buffer you’ll have to fetch that data from the GPU. Which means creating some boiler plate code and making use of the “.CopyCount” method:
//create append buffer
var appendBuffer = new ComputeBuffer(size, stride, ComputeBufferType.Append);

...

[Dispatch]

...

//create a copy buffer to fetch data from the GPU
var countBuffer = new ComputeBuffer(1, sizeof(int), ComputeBufferType.IndirectArguments);
ComputeBuffer.CopyCount(appendBuffer, countBuffer, 0);

//fetch counter value
int[] counter = new int[1] { 0 };
countBuffer.GetData(counter);

//store in single variable
int count = counter[0];
Counter Buffer
The thing with GPUs is, that when multiple cores try to modify the same value it doesn’t really go well for everyone involved. We call that a “race condition” and while not impossible to work around, there is a little bit of synchronizing involved.
That’s what the Counter Buffer type is for. It handles all the pesky synchronization, at a small performance cost.
To specify a Counter Buffer you need a dedicated HLSL type with helper methods:
RWStructuredBuffer<int> Counter;

void CSMain (uint3 id : SV_DispatchThreadID)
{
    //increment counter and return current length
    int count = Counter.IncrementCounter();

    //decrement counter and return current length
    int count = Counter.DecrementCounter();
}
And the C# part works very much like with the “Append” type.
//create counter buffer
var counterBuffer = new ComputeBuffer(size, sizeof(int), ComputeBufferType.Counter);
counterBuffer.SetCounterValue(0);

...

[Dispatch]

...

//create a copy buffer to fetch data from the GPU
var countBuffer = new ComputeBuffer(1, sizeof(int), ComputeBufferType.IndirectArguments);
ComputeBuffer.CopyCount(appendBuffer, countBuffer, 0);

//fetch counter value
int[] counter = new int[1] { 0 };
countBuffer.GetData(counter);

//store in single variable
int count = counter[0];
Buffer Mode
Most of the Buffer Modes that you can specify for your ComputeBuffer are either deprecated, or part of very low-level optomization. But I still want to talk about one of them: the “immutable” type.
An “immutable” ComputeBuffer is good to store baked data that doesn’t change, since the compiler can heavily optimize a buffer that is only uploaded once.
Check the Compiled Code
When looking at the inspector of any Compute Shader, you can click “View compiled code” to see what code Unity has actually compiled from your base shader file.
Most of this is highly optmized and already compiled into lower instructions. But you should still be able to spot left over branching and other possible things that you can optimize.
However this is pretty advanced stuff and without enough practice you can do more harm than good here. So take a look, but don’t bother with it too much.
Where to go from here?
With the basics established you now need to get familiar with the whole process. If you don’t already have something in mind, why not continue what we have done so far and fill the Voxel terrain with some noise layers?
Or even develop your own Marching Cubes implementation to render the data into an actual mesh.
With Compute Shaders it really comes down to what you want to accomplish. But generally you want to test out the limits of the system first.
Make a shader with alot of conditionals.
Make one with 20 different 4K textures.
Make one that randomly throws a NaN.
Make a Dispatch every second with all of the above.
Spawn a shader with 1x1x1 Thread Groups and then the same one with 128x128x128 Thread Groups.
And so on.
You’ll need to know what works and what doesn’t. What errors can be thrown and how the system behaves when you are trying to work with very large data, alot of calls per second or generally complex shaders with alot of branching.
This way you can get a feeling of what is and what isn’t possible and make good decisions before wasting a months worth of work on an algorithm that would’ve been better left on the CPU.
Closing Words
Writing this tutorial took a long time, but I hope I could touch all the major points to a satisfying degree. Let me know if I missed anything.
Have a good one.